Text to Speech for YouTube, TikTok, and Reels!
March 21, 2025

Spoken voice can add a powerful, emotional salience to capture serial-scrollers mid swipe on your post. The costs in both time and equipment to produce high quality narration can be daunting when social media deadlines are coming up one after another. Wouldn’t it be nice to have someone else do it for you?
Say hello to KineMaster’s newest AI tool, Text to Speech.
WIth the introduction of KineMaster 7.6, Text to Speech makes narration work as easy as tapping a button (or two). In no time, you can have your text or caption layers converted to spoken audio, leaving you with time left over to focus on other parts of your production.
What is Text to Speech?
Text to Speech analyzes the written words in your text or caption layer and then uses AI to read those words aloud. Text to speech can be used as-is for rough video narration, can be used as a placeholder to approximate the timing you will need when you receive a final narrative track, or could even be its own character in your video stories!
What to Know: KineMaster’s Text to Speech Tool
● Fast Automatic Voice Generation
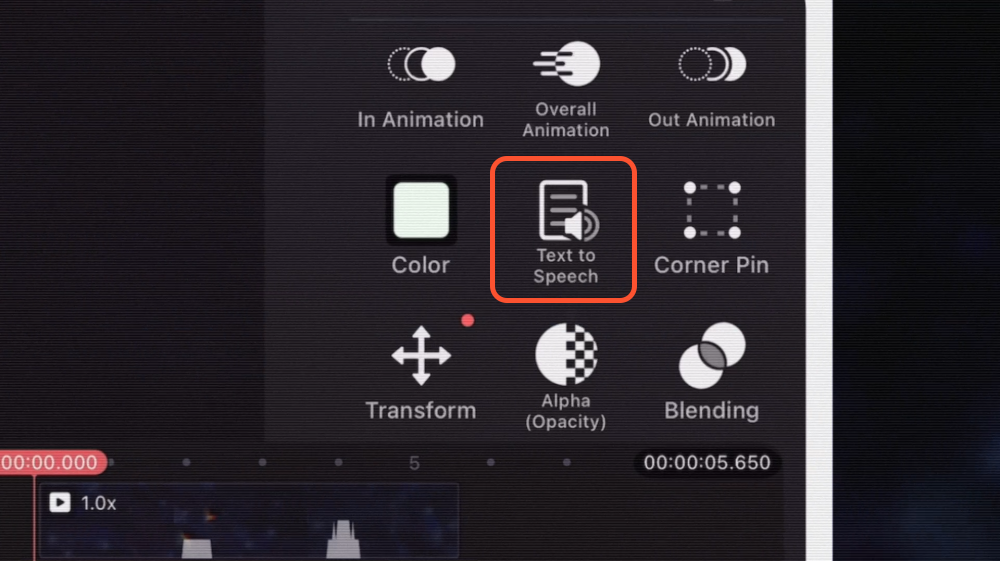
Just tap a text or caption layer to select it, then tap the Text-to-Speech button. Choose your voice and tap Convert. Done!
● Three Languages, Multiple Voices
Text to Speech supports English (one voice, female), Korean (one voice, female), and Indonesian (four voices, male and female) at this time. There are plans to add additional language support in the future.
● On-device AI Processing
Your text is not uploaded to be processed (or saved or snooped on) on remote servers. Everything stays on your phone or tablet, never leaving your sight. This makes KineMaster’s AI ideal for pre-production tests, situations where videos depict sensitive or secret information, and other privacy-critical video editing applications.
How to Use the Text to Speech tool
It’s easy to get started with Text to Speech, but it’s always nice to have a reference point. Below are the step-by-step instructions, with an example, to get going.
● STEP 1: Create a text layer
Add a text layer by tapping the Layer button, then Text. What you type will be converted to audio in step 2.
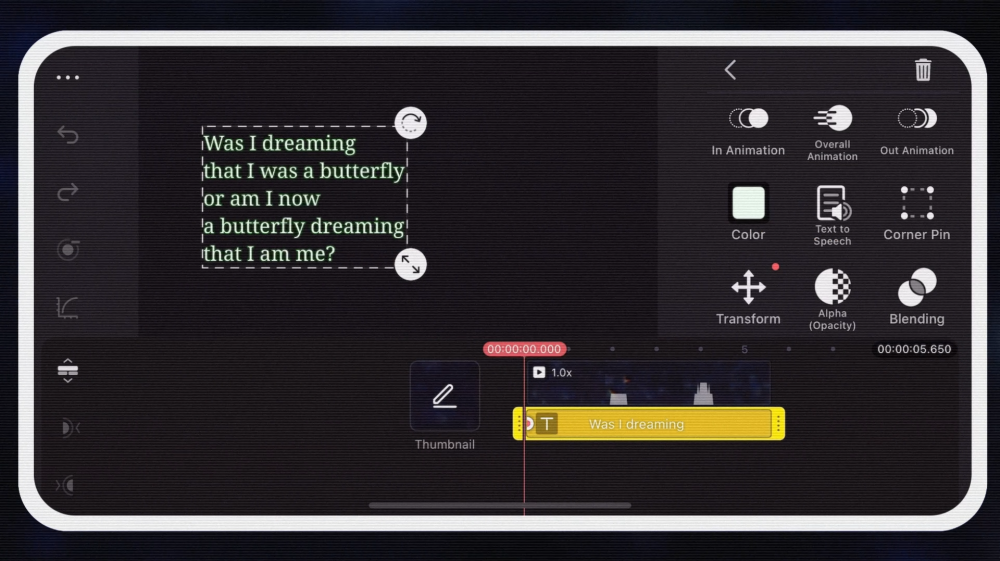
● STEP 2: Tap Text to Speech
After you close the text entry window on your Text layer, tap the Text to Speech button.
● STEP 3: Install the Plug-in
First-time users need to install the Text to Speech plug-in. You will only need to do this once. Tap Get Plugin, then download the Text to Speech plugin from the Asset Store. Text to Speech works best when the written text is in the same language as the plug-in.
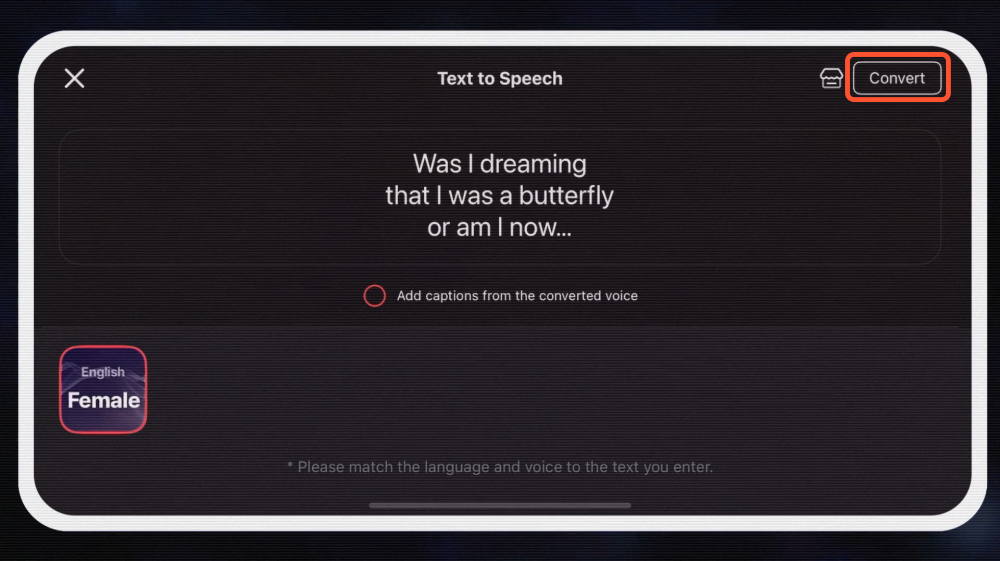
● STEP4: Tap Convert
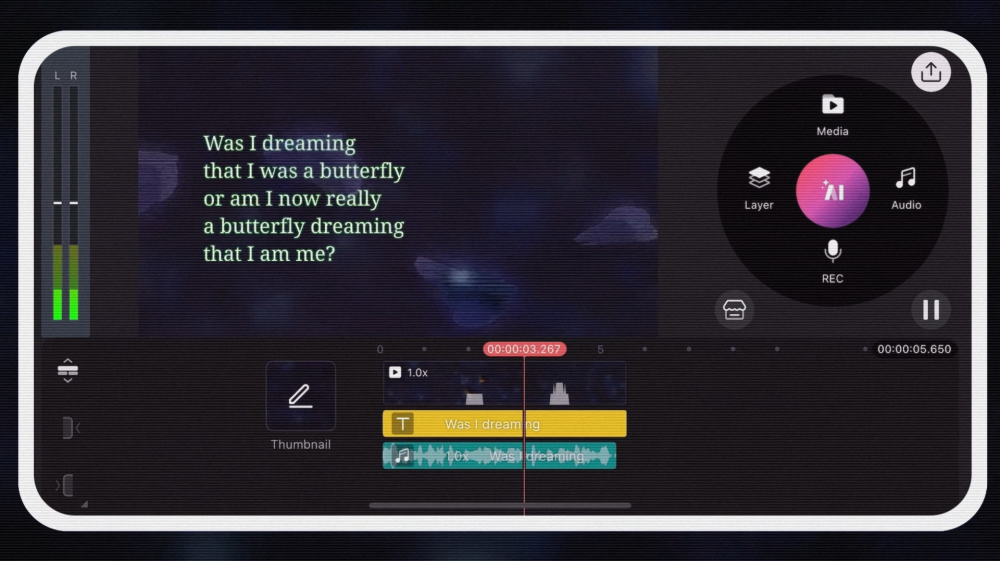
Now, when you tap Text to Speech a conversion screen will pop up. You can choose if you want to sync your audio to captions (so that the caption duration matches the spoken narration). Next, tap Convert in the top right to start the process. When the conversion is complete, an Audio layer is automatically added to your Timeline.
Text to Speech in Action
There are lots of great videos about use cases for Text to Speech. Here are a few to get your creativity going:
● Blocking out timing
If you need to edit a video before the audio narration has finished production, you can use Text to Speech as a stand-in to figure out rough cut times and creative arrangement.
● Shorts, Reels, and TikTok
If you’re producing a really high volume of video content for “quick fix” video feeds, time may not be on your side. Text to Speech gives you the narration when speed is more important than perfection.
● 3rd person VO commentary
When you’re a one-person production house, you don’t have a lot of options when it comes to dialog. With Text to Speech, you’ve got a new friend to talk with.
Update to KineMaster 7.6 and try Text to Speech for yourself!

Two apps, one subscription!
Subscribers to KineMaster Premium get Spring Premium for free!